|
|
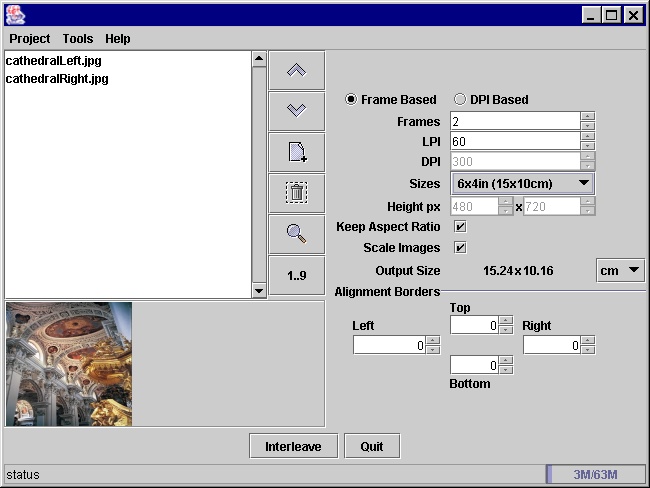
When you start Lentikit you will be presented with the working screen:

The sections on this screen are:
This is a pane where you can organise the images that you
will be interleaving to create your lenticular. They should be
organised in left to right order. When you select an image a small
thumbnail will be shown in the preview window below the list.
Lentikit only takes jpg and png images at the moment.
To add images to this panel you can drag them from your file
explorer, or you can click on the open file icon
 and use a standard
file window. Note in the file window you can select several files at
once for adding.
The order of the images can be changed using the
move up
 , move
down
 , remove
 and sort
(1..9) buttons - the sort button will re-order the images
alphabetically (or reverse if you click again).
Clicking on the preview button
 will bring up a new window with the selected
image in it. You can scroll around the image using the scroll bars
(if its big enough) and zoom in/out by right/left cli
cking with the
mouse (be sure to hold it very still while doing so).
-
Frame Based/DPI Based
-
Lentikit can work in two modes - in frame based mode you specify the
number of images that are going to be used to produce your final image, and
lentikit simply interleaves these images to produce the output. This is the mode
to use when your printer is reasonably high resolution cmpared to your
lenticular and the number of frames. For example 10 frames on a 4800 dpi printer
for a 60 LPI sheet would mean that each frame gets 4800/60/10 = 8 printer
pixels. The final image is scaled up to the desired size by the printer.
In DPI mode lentikit will attempt to calculate which image should be
displayed for each
printer
pixel. This is the solution you might use
with a full colour 600dpi printer. The output image size is an exact one for one
match image pixel and printer pixel. This mode is not extensively tested.
-
Frames
-
when working in frames mode you enter the number of frames
you want in the output image. This field is disabled in DPI mode as Lentikit
calculates it for you.
-
LPI
-
The number of lenticular lenses per inch - used in frames mode
when calculating the output size, and possibly the image height and width. Used
in DPI mode to calculate how many frames fit in a single
lenticular lens.
-
DPI
-
The Dots Per inch of the target printer - disabled in frames
mode as it isn't needed. In DPI mode used to calculate how many frames fit in a
single lenticular lens.
-
Sizes
-
In this combo box you can select some standard output sizes,
and also select Custom - where you can specify the size of the output image in
pixels and not inches(mm). In a future version of Lentikit you will be able to
add more choices to this item.
-
Size px
-
If you have selected Custom in the Sizes field you can enter
the desired size of the output image here. If you have selected one of the
standard sizes these fields will show you the calculated image size in
pixels.
-
Keep Aspect Ratio and Scale Images
-
Currently under consideration.
-
Output Size
-
This is quite an important field, it shows you the size
that you should print the the output image at. Lenticulars are very sensitive to
alignment, and it is not always possible to exactly match the requested output
size in the Sizes field. This area tells you what size you should use in the
program you use for printing.
-
The Alignment Borders
-
Lentikit can add black and white lines around your interleaved image that
can assist when putting the lenticular sheet over the image. More detail on this
to come.
Pressing the Quit button simply closes the window - take care at the moment
you are not prompted to save your project.
Pressing the Interleave button performs the interleave process, a progress
window will be displayed, and when it has finished the interleave preview window
will open. Described below.
Actually this section doesn't have a lot of useful
stuff at the moment. The thingy to the right is a memory monitor for debug
purposes - because of the way java works you will see this go up and down
wildly. If you right-click on it it will try to recover as much memory as
possible, right-clicking again usually reclaims all available memory.
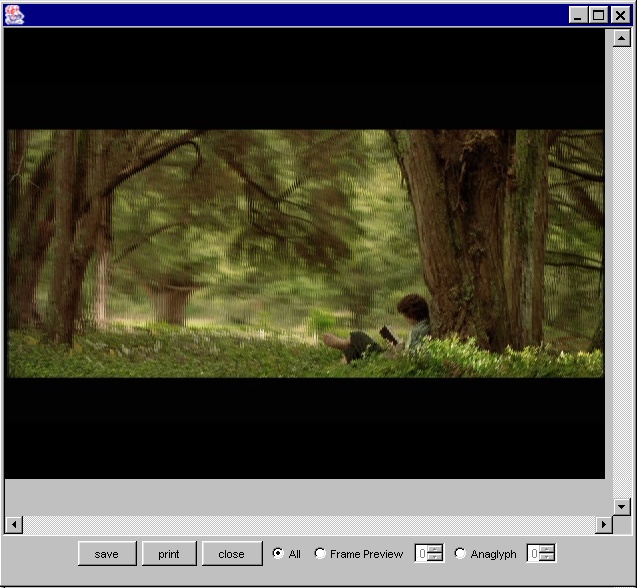
The preview window looks something like:

This window has two areas, the top one is a preview of the image,
itself, if you carefully right or left click you can zoom in and out. The
buttons at the bottom allow you to save and pre-view the interlaced output
-
Save
-
Pressing this button will bring up a file chooser so you can save the image as PNG or JPEG.
Always
use PNG, there is a mode of JPEG that will allow you to
save the image without the annoying JPEG colour resolution reductions, but it's
not yet implemented.
-
Print
-
The Print button is an experimental feature that you can
use to print the image directly to a printer without saving it first. It should
print at the size noted in the Output Size field previously described. Please
note it
is
experimental at the moment.
-
All, Frame Preview, Anaglyph
-
These buttons allow you to choose to view a particular
"
frame
"
of
the output image, the idea is to let you get a feel for how the lenticular will
appear once finished.
The Frame Preview radio button will select
the frame indicated by the
"
number spinner
"
. You can see what resolution the final frame will
appear at.
The Anaglyph radio button will select the two frames selected in the
"
number spinners
"
and produce a (not very good) anaglyph of the two
frames for viewing with red-cyan glasses. This feature is SLOW, but it is
intended to give you an even better idea of how the finished lenticular will
look.
-
Close
-
The close button will dismiss the window.
When Lentikit starts up it defaults to trying to use the look and feel
that is natural for the OS you are running, if you want to change to another
look and feel you can select it from the tools menu. At a future date
Lentikit will support some of the
other
look and feels
available to java.
|

